1
2
3
4
5
6
7
8
9
10
11
12
13
14
15
16
17
18
19
20
21
22
23
24
25
26
27
28
29
30
31
32
33
34
35
36
37
38
39
40
41
42
43
44
45
46
47
48
49
50
51
52
53
54
55
56
57
58
59
60
61
62
63
64
65
66
67
68
69
70
71
72
73
74
75
76
77
78
79
80
81
82
83
84
85
86
87
88
89
90
91
92
93
94
95
96
97
98
99
100
101
102
103
104
105
106
107
108
109
110
111
112
113
114
115
116
117
118
119
120
121
122
123
124
125
126
127
128
129
130
131
132
133
134
135
136
137
138
139
140
141
142
143
144
145
146
147
148
149
150
151
152
153
154
155
156
157
158
159
160
161
162
163
164
165
166
167
168
169
170
171
172
173
174
175
176
177
178
179
180
181
182
183
184
185
186
187
188
189
190
191
192
193
194
195
196
197
198
199
200
201
202
203
204
205
206
207
208
209
210
211
212
213
214
215
216
|
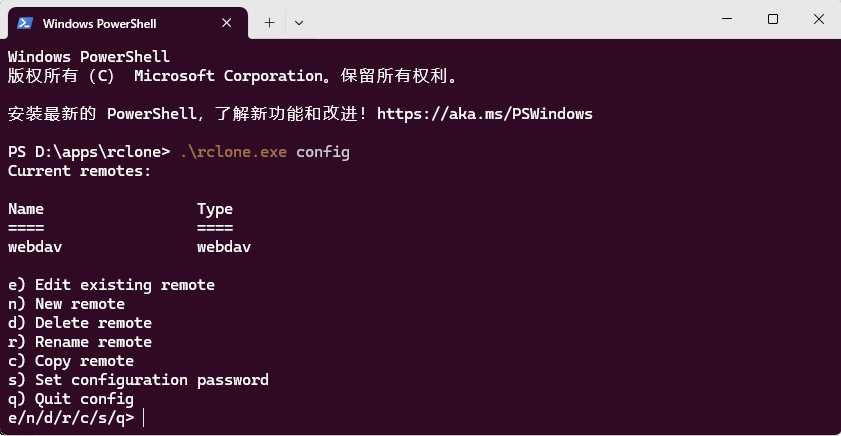
PS D:\apps\rclone> .\rclone.exe config
Current remotes:

Name                 Type
====                 ====
webdav               webdav

e) Edit existing remote
n) New remote
d) Delete remote
r) Rename remote
c) Copy remote
s) Set configuration password
q) Quit config
e/n/d/r/c/s/q> n

Enter name for new remote.  # 给webdav起个名字,随便。
name> digops

Option Storage.  # 选择是那种存储类型,webdav是51,就输入51.
Type of storage to configure.
Choose a number from below, or type in your own value.
 1 / 1Fichier
   \ (fichier)
 2 / Akamai NetStorage
   \ (netstorage)
 3 / Alias for an existing remote
   \ (alias)
 4 / Amazon S3 Compliant Storage Providers including AWS, Alibaba, ArvanCloud, Ceph, ChinaMobile, Cloudflare, DigitalOcean, Dreamhost, GCS, HuaweiOBS, IBMCOS, IDrive, IONOS, LyveCloud, Leviia, Liara, Linode, Minio, Netease, Petabox, RackCorp, Rclone, Scaleway, SeaweedFS, StackPath, Storj, Synology, TencentCOS, Wasabi, Qiniu and others
   \ (s3)
 5 / Backblaze B2
   \ (b2)
 6 / Better checksums for other remotes
   \ (hasher)
 7 / Box
   \ (box)
 8 / Cache a remote
   \ (cache)
 9 / Citrix Sharefile
   \ (sharefile)
10 / Combine several remotes into one
   \ (combine)
11 / Compress a remote
   \ (compress)
12 / Dropbox
   \ (dropbox)
13 / Encrypt/Decrypt a remote
   \ (crypt)
14 / Enterprise File Fabric
   \ (filefabric)
15 / FTP
   \ (ftp)
16 / Google Cloud Storage (this is not Google Drive)
   \ (google cloud storage)
17 / Google Drive
   \ (drive)
18 / Google Photos
   \ (google photos)
19 / HTTP
   \ (http)
20 / Hadoop distributed file system
   \ (hdfs)
21 / HiDrive
   \ (hidrive)
22 / ImageKit.io
   \ (imagekit)
23 / In memory object storage system.
   \ (memory)
24 / Internet Archive
   \ (internetarchive)
25 / Jottacloud
   \ (jottacloud)
26 / Koofr, Digi Storage and other Koofr-compatible storage providers
   \ (koofr)
27 / Linkbox
   \ (linkbox)
28 / Local Disk
   \ (local)
29 / Mail.ru Cloud
   \ (mailru)
30 / Mega
   \ (mega)
31 / Microsoft Azure Blob Storage
   \ (azureblob)
32 / Microsoft Azure Files
   \ (azurefiles)
33 / Microsoft OneDrive
   \ (onedrive)
34 / OpenDrive
   \ (opendrive)
35 / OpenStack Swift (Rackspace Cloud Files, Blomp Cloud Storage, Memset Memstore, OVH)
   \ (swift)
36 / Oracle Cloud Infrastructure Object Storage
   \ (oracleobjectstorage)
37 / Pcloud
   \ (pcloud)
38 / PikPak
   \ (pikpak)
39 / Proton Drive
   \ (protondrive)
40 / Put.io
   \ (putio)
41 / QingCloud Object Storage
   \ (qingstor)
42 / Quatrix by Maytech
   \ (quatrix)
43 / SMB / CIFS
   \ (smb)
44 / SSH/SFTP
   \ (sftp)
45 / Sia Decentralized Cloud
   \ (sia)
46 / Storj Decentralized Cloud Storage
   \ (storj)
47 / Sugarsync
   \ (sugarsync)
48 / Transparently chunk/split large files
   \ (chunker)
49 / Union merges the contents of several upstream fs
   \ (union)
50 / Uptobox
   \ (uptobox)
51 / WebDAV
   \ (webdav)
52 / Yandex Disk
   \ (yandex)
53 / Zoho
   \ (zoho)
54 / premiumize.me
   \ (premiumizeme)
55 / seafile
   \ (seafile)
Storage> 51

Option url.  # 输入webdav的url地址+端口号,这个地址其实是一个全地址,后面可以继续指定目录路径。
URL of http host to connect to.
E.g. https://example.com.
Enter a value.
url> http://nas.digops.cc:xxxx

Option vendor. # 使用webdav是哪个厂商的,自建就选other。
Name of the WebDAV site/service/software you are using.
Choose a number from below, or type in your own value.
Press Enter to leave empty.
 1 / Fastmail Files
   \ (fastmail)
 2 / Nextcloud
   \ (nextcloud)
 3 / Owncloud
   \ (owncloud)
 4 / Sharepoint Online, authenticated by Microsoft account
   \ (sharepoint)
 5 / Sharepoint with NTLM authentication, usually self-hosted or on-premises
   \ (sharepoint-ntlm)
 6 / rclone WebDAV server to serve a remote over HTTP via the WebDAV protocol
   \ (rclone)
 7 / Other site/service or software
   \ (other)
vendor> 7

Option user.  # webdav用户名
User name.
In case NTLM authentication is used, the username should be in the format 'Domain\User'.
Enter a value. Press Enter to leave empty.
user> jy

Option pass.  # webdav密码
Password.
Choose an alternative below. Press Enter for the default (n).
y) Yes, type in my own password
g) Generate random password
n) No, leave this optional password blank (default)
y/g/n> y
Enter the password:
password:
Confirm the password:
password:

Option bearer_token.  # 直接回车,不用管。
Bearer token instead of user/pass (e.g. a Macaroon).
Enter a value. Press Enter to leave empty.
bearer_token>

Edit advanced config?  # 选择n,不编辑高级配置。
y) Yes
n) No (default)
y/n> n

Configuration complete.
Options:   # 打印出的配置信息
- type: webdav
- url: http://nas.digops.cc:xxxx
- vendor: other
- user: jy
- pass: *** ENCRYPTED ***
Keep this "digops" remote?
y) Yes this is OK (default)
e) Edit this remote
d) Delete this remote
y/e/d> y

Current remotes:

Name                 Type
====                 ====
digops               webdav
webdav               webdav

e) Edit existing remote
n) New remote
d) Delete remote
r) Rename remote
c) Copy remote
s) Set configuration password
q) Quit config
e/n/d/r/c/s/q>
|